New Purchase
So recently my PC had a major hardware change (Motherboard and CPU) in terms of licensing this is a BIG change as the Win7 license is tied to these main components however there it a way to transfer it BUT there are two caveats:
- OEM Installs cannot be moved to new hardware but it could be worth trying prior to reformat/re-install.
- In-place Upgrades and Repair installs cannot be moved.
To achieve this there are 2 paths to take, the first and by far the easiest is the second way explained below and the correct safer more in-depth way is the first and I highly recommend you take this path even if you do not have much in the way of Windows Admin skills as you will end up with a backup and a bootable system.
Ok so the following method will provide you with a a back up of a “Generalised/SysPreped” Win7 Install, this means that it will be as it was when you first installed it and will want to install all the detected hardware.
Additional thoughts
Consider running Ccleaner to clear out any junk files.
Run chkdsk /f /r to find and fix any potential issues that may be present and to ensure all system files are contiguous, if this creates a whole bunch of .chk files and folders then this is the time to fix that otherwise it will follow you to the new install and bite you in the butt!
Run Defraggler to ensure all files on the disk are in logical order.
NOTE:
Depending on how your install was licensed using this method causes Windows 7 to lose all activation information, and it needs to be reactivated afterwards.
If your Windows 7 is an OEM version, you might not be able to reactivate it, at least not without the phone activation option.
If you used an ISO you obtained from a torrent source then your system should still be licensed due to the SLIC telling Windows it is on a different motherboard anyway but if you just used a keygen you may need to dig that out (see final note.)
I do not recommend to use this method on RAID systems. All experiments on RAID I know have failed.
Use this method if you:
– Change other hardware components but keep your old HD containing Windows 7
– Move the HD containing Windows 7 to another computer
The Process
- Before installing new hardware, boot Windows 7 normally
- Disconnect all external hardware except mouse, keyboard and main display. If your system folders are located only on C: drive, disconnect all other hard disks except that containing the C:. In case of relocated system folders, for instance the profile folder Users located in another drive and other system folders on C:, first move the relocated system folders back to C: then disconnect all other drives. Reboot after this
-
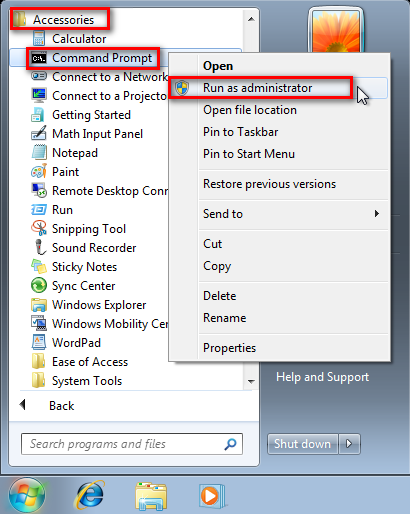
Run Command Prompt as administrator
-
Type to Command Prompt: %windir%\System32\Sysprep\Sysprep.exe

-
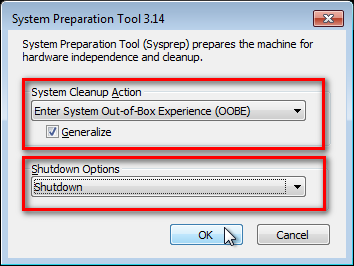
In sysprep dialog that opens, choose System Cleanup Action as Enter System Out-of-Box-Experience (OOBE), selectGeneralize, select Shutdown Options Shutdown. Click OK
-
Sysprep generalizes now your Windows 7 setup and shuts down your computer. Do not run any other programs during this phase!
At this point you can intercept to take a backup of the system, this backup will be “Generalised” and when installed you would need to finish the last steps below BUT the backup will effectively work on ANY hardware combination!!
1) Boot PC with an imaging CD/DVD (Paragon, Macrium etc.). Here’s a video tutorial for imaging with Macrium Free: Imaging with free Macrium.
2) Create an image of your system
3) Turn PC off, change the hard disk(s) and reboot with imaging application, restoring the image OR boot the new computer with imaging software and restore the image.
4) Continue from step 7 - Switch the main power of your PC off and install the new hardware OR dismount the hard disk(s) and mount it (them) to a new computer.
-
Boot the PC from sysprep generalized hard disk. You will notice Windows booting as if it was the first boot after installation, installing default drivers and updating registry. One or two reboots are needed, depending on your system specifications.
Note: You might see on first boot Windows can’t finish configuring, a reboot into safe mode, then a normal reboot will allow it to finish successfully why this is I cannot fathom but it works …Don’t give up, this has happened to me both times I used a sysprepped system drive in a new computer. - When Windows finally boots up, you will need to enter all information as if this really was a new, fresh installation.
- Because your old user profiles already exist, Windows does not accept your normal username, but instead you have to create a new temporary user. I use username Test for this purpose.
- When login screen appears, choose your old user account to login.
- Windows boots now to default OOBE first boot desktop, with default 800*600 resolution and default theme. All your installed applications are there, as well as your old user profiles and folders. Windows has installed the default drivers for your setup, you can update them if needed
- Go to Control Panel > User Accounts and delete the temporary user account (in this case Test) that you just created.
So there you go not hard really and now if you followed all the steps you have a backup of your system as it was when you began that you know is going to work on any hardware combination.
Easy option
This procedure describes how to do it. It Procedure can be used in case of:
*The Hard tutorial above doesn’t work.
*You forgot to SYSPREP.
*You can’t SYSPREP because your motherboard died.
*You simply don’t want to use SYSPREP.
1) Download “Paragon Adaptive Restore 2010” from my My DROPBOX.
2) Burn the ISO to CD/DVD using Windows Disc Image Burner or ImgBurn.
3) Set CD/DVD as first boot device in BIOS.
Do the following:
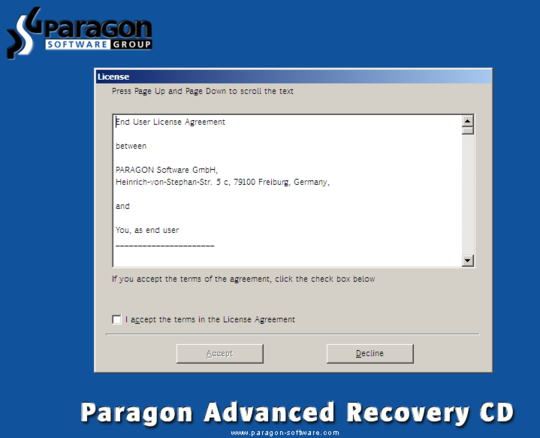
- Boot the computer from Paragon Windows PE 3.0 based CD/DVD.
-
Accept the end user license agreement, otherwise you are not able to use the tool.
-
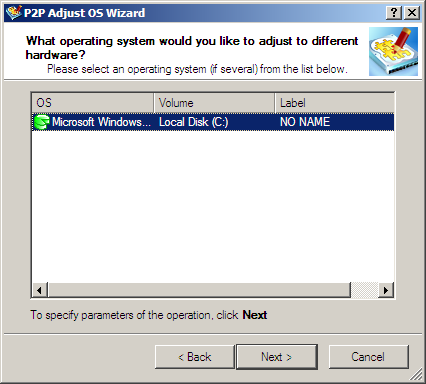
Launch P2P Adjust OS.

-
Select the operating system you need to adjust to your new hardware.
-
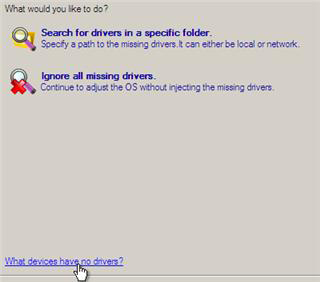
Choose whether you want to add third-party drivers or not, and the way to do it.
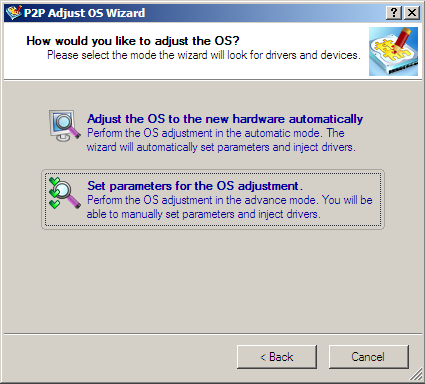
- If you chose “Adjust the OS to the new hardware automatically”, the P2P Adjust OS Wizard will automatically accomplish all the necessary actions.
-
The only thing that might need your interaction is to specify additional driver repository.
-
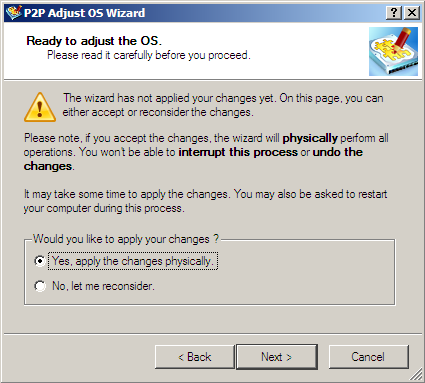
At last, choose “Yes, apply the changes physically” and then restart your computer after operations are done. Do remember, you cannot interrupt the process or undo the changes.
Complete pdf manual: My DROPBOX.
-
Just before the OS adjustment, you can additionally:
extraSometimes the internal hard drive is not recognized in Paragon P2P Adjust OS due to missing SATA or RAID driver. In that case add specific drivers to Windows PE based Paragon Recovery Environment.
NOTE:You can only add third-party drivers in INF file. If they are zipped, you need to unpack them before processing the steps. The Windows PE environment is 32bit-based, so you need to use 32-bit drivers for injection.A. Click to open Add Drivers dialog.
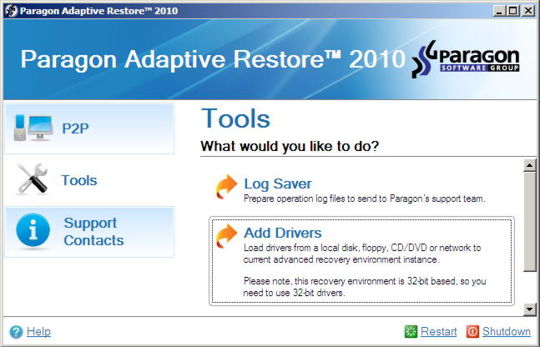
B. Browse for an .INF file of the required driver, then click the Open button to initiate the process.
C. Click Yes to confirm the operation. -
After procedure has finished successfully and system boots fine, first check if there are any updates waiting, if you have been avoiding the Win10 upgrade and Telemetry don’t forget to grab the latest batch update uninstaller and run it before downloading updates.
After that:
A. Uninstall Device and Device Driver for devices no longer attached to system. Uninstall associated software as well.
B. Install all of your device drivers, then Windows Updates.
C. Refresh your Windows Experience Index (WEI) score.
D. When done, all you will need to do is to activate Windows 7. - After rebooting from disk the drivers should start swapping out in a cascade you can monitor by clicking on the system tray animation. Wait until all are finished before doing the requested restart.
- After reboot, go immediately to Check for Updates and install all Important and Optional Updates which may include critical drivers and patches for the OS to run on that hardware.
- You must reactivate at the Change Product Key link on System page. If it’s not present you can insert Product Key and then Activate using SLMgr Commands.
So there you have it two ways to do what many thought is not possible, I went with the first way and now have what I call a “Ready to go backup” meaning that it has all the software I use regularly, configured, licensed. This will stand me in good stead for my next project …Deploy a win7 kvm on a linux host!
Additional note since site update: I have had many requests to provide a solution for Win10, I’m sorry but I doubt it would work and to be honest this was attempted by me to allow me to move to windows 10 but I wanted a way to convert what I had into a fresh image that would work any where(kvm and pc) it did for me.